Creating Invoices
Step-by-step guide to creating professional invoices in PineBill.
Quick Start
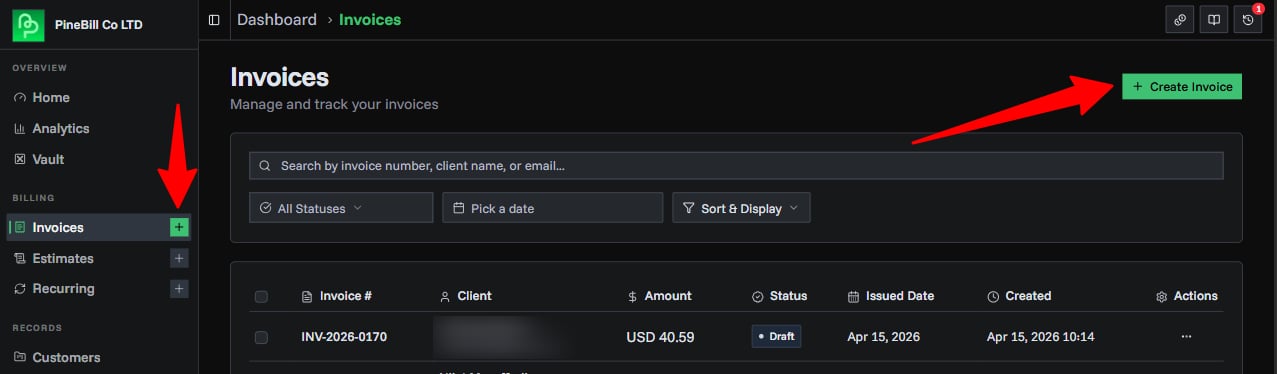
Access the invoice generator from your dashboard by clicking "Plus" button on the sidebar or "Create Invoice" button from Invoices pages.
User Interface
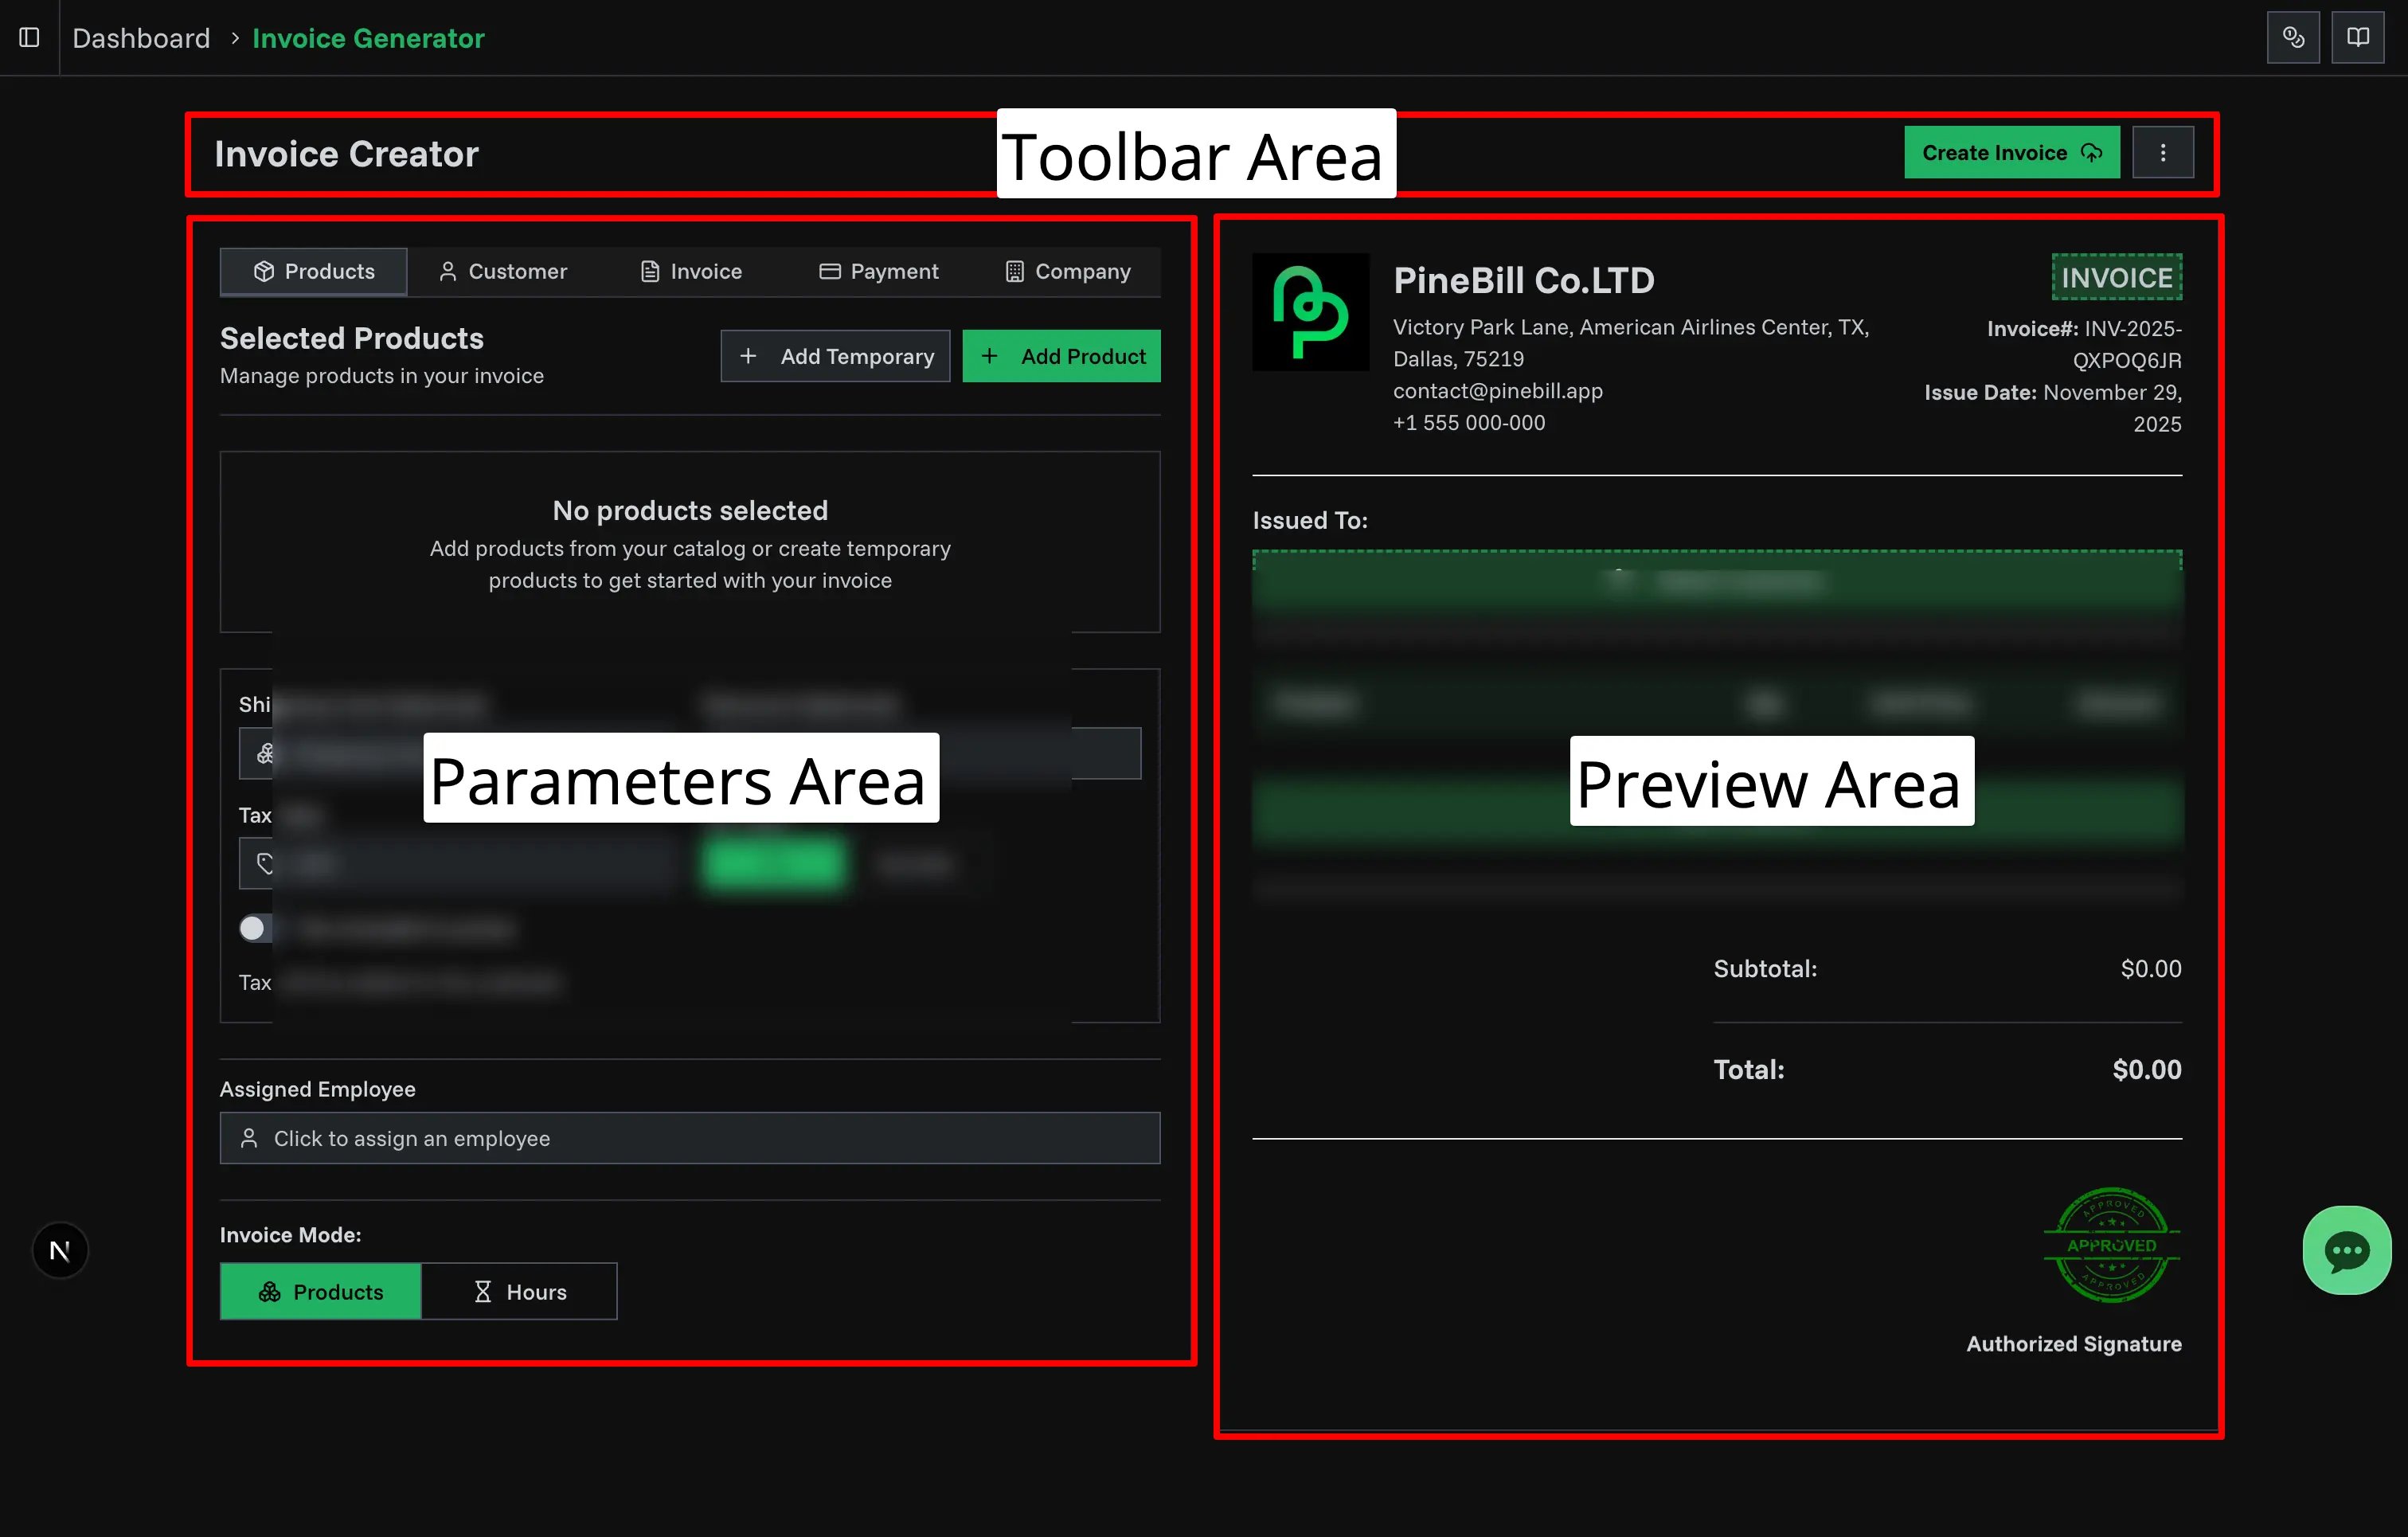
The invoice generator interface consists of 3 main regions:
- Parameters Area: Tabbed interface where you configure invoice details (Customer, Products, Invoice Details, Payment Methods, Company Info)
- Preview Area: Visual preview of your invoice (note: this is not real-time PDF generation, but an HTML preview)
- Toolbar Area: Top bar with Create Invoice button, options menu, and template/format settings
Toolbar Features
The toolbar at the top of the invoice generator provides quick access to display options and the create button.
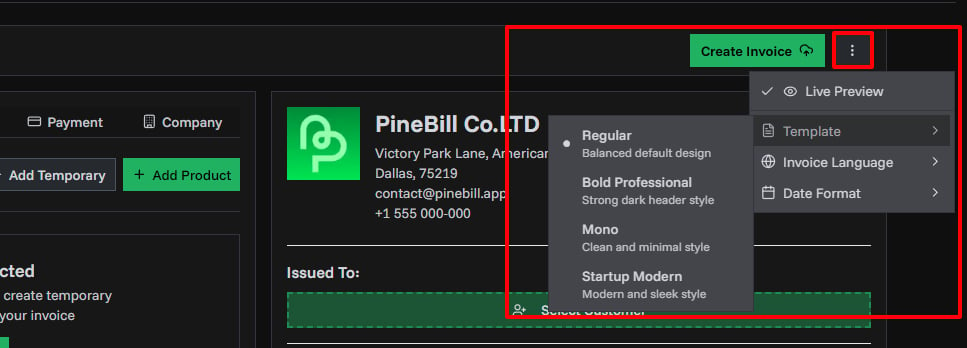
Live Preview
Toggle live preview from the options menu to see your invoice in real-time as you make changes.
Templates
Select your invoice template from the options menu (top right):
- Classic: Clean, traditional design
- Bold Professional: Contemporary with bold accents
- Mono: Minimalist, monospace style
- Startup Modern: Sleek, modern look for startups
Each template includes all the same information with different visual styling. Learn more about templates.
Date Formats
Select date format from options menu. Available formats:
| Format 1 | Format 2 | Format 3 |
|---|---|---|
| MM/DD/YYYY | Month DD, YYYY | Mon DD, YYYY |
| DD/MM/YYYY | DD Month YYYY | DD Mon YYYY |
| YYYY-MM-DD |
Invoice Language
Select the language for your invoice PDF labels and text. This controls how section titles, column headers, and standard text appear on the generated PDF.
PineBill Supported Languages:
| Language | Language | Language |
|---|---|---|
| Arabic (العربية) | English | Italian (Italiano) |
| Azerbaijani (Azərbaycan dili) | French (Francais) | Japanese (日本語) |
| Chinese (中文) | German (Deutsch) | Korean (한국어) |
| Portuguese (Portugues) | Spanish (Espanol) | Turkish (Türkçe) |
The language setting only affects PDF labels (like "Bill To", "Invoice Date", "Total"). Your custom content such as product names, descriptions, and messages remains unchanged.
Set your default language in Invoice Settings to save time when creating invoices.
Step-by-Step Guide
Requirements
To create an invoice you must have:
| Requirement | Status | Details |
|---|---|---|
| Customer | Required | At least one customer |
| Product/Service Items | Required | At least one line item |
| Invoice Number | Auto-filled | Automatically generated |
| Issue Date | Auto-filled | Defaults to current date |
The invoice generator has 5 tabs. Fill them out to create your invoice.
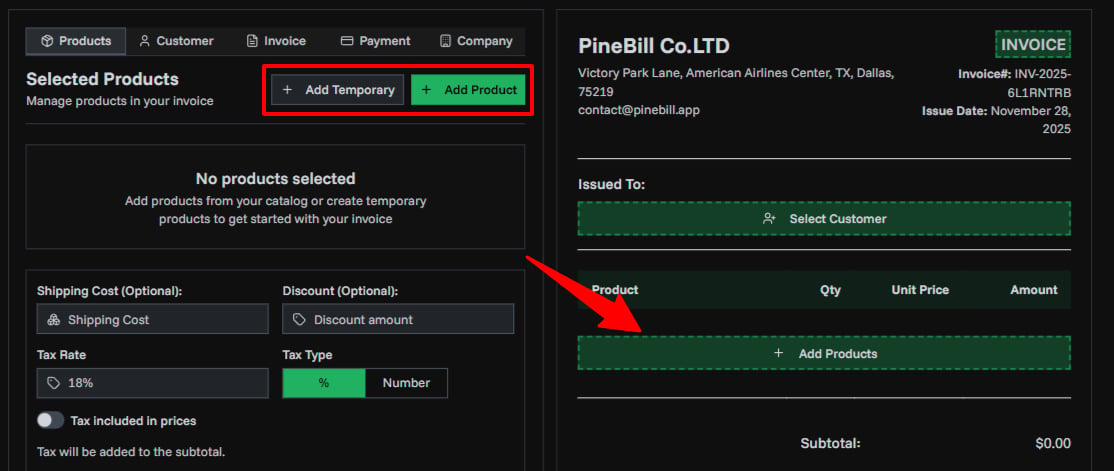
1. Products/Services (Required)
Add items to your invoice using the inline product row at the bottom of the products table:
- Type to Search: Start typing a product name in the inline row. An autocomplete dropdown appears with matching products from your catalog. Recent products are shown automatically when you click the field.
- Select from Catalog: Click a product in the dropdown to instantly add it to your invoice with its saved name, model, and price.
- Create Inline Temporary Item: Type a new product name that doesn't match any catalog product, then fill in the model, quantity, and price fields in the same row. Press Enter or click outside to add it. Temporary items are not saved to your catalog.
- Browse All Products: Click "Browse All Products" at the bottom of the autocomplete dropdown to open the full product selector with filters, categories, and multi-select.
Selected Product Features:
- Drag to Reorder: Click and drag items to change their order on the invoice
- Inline Editing: Click any quantity or unit price to edit it directly in the table. For temporary items, you can also click to edit the name and model.
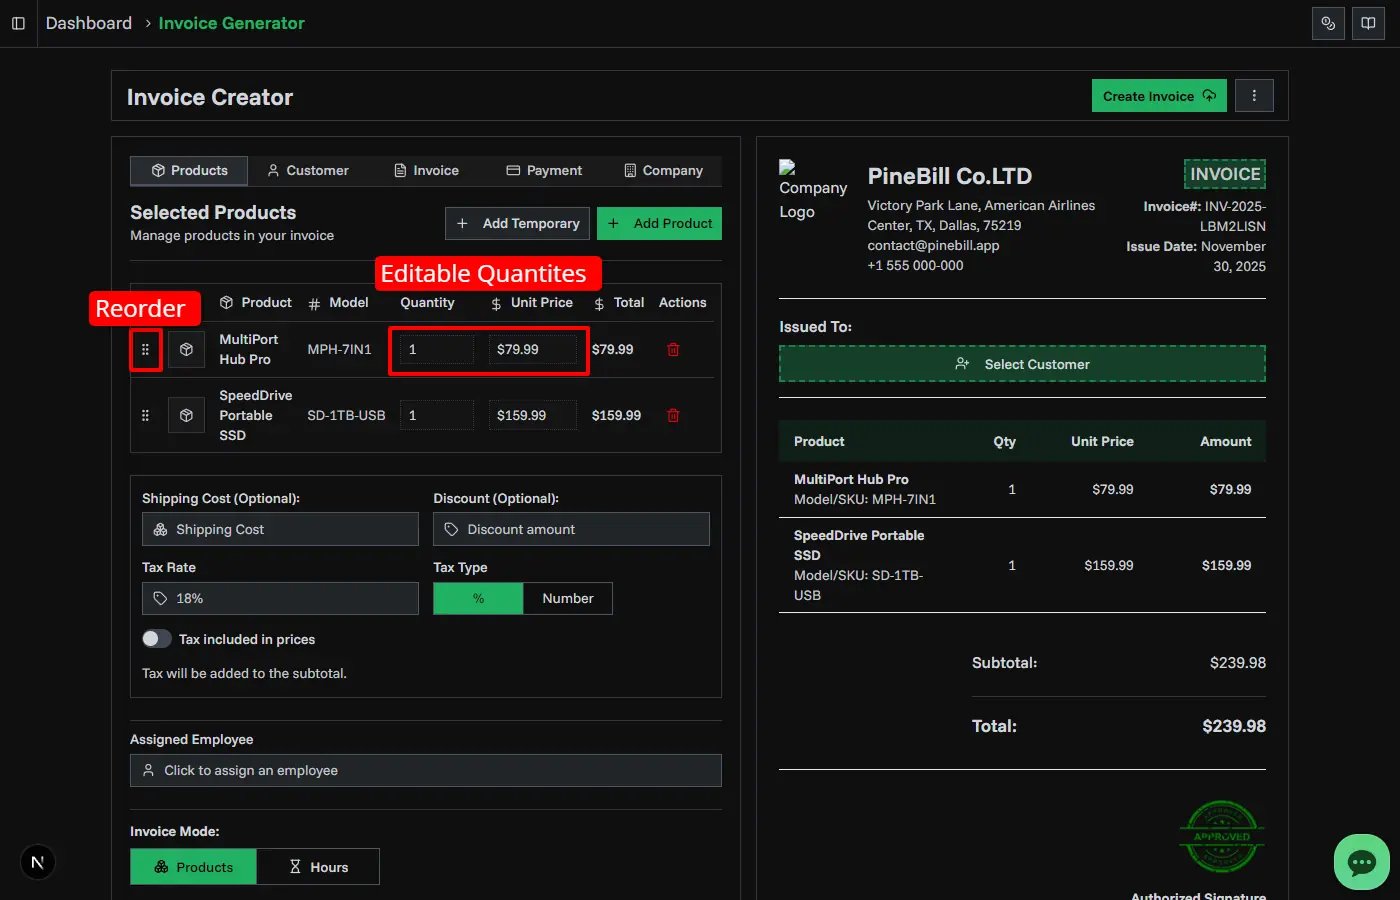
Additional Costs:
- Shipping: Add delivery or shipping costs
- Discount: Apply a fixed discount amount
- Tax: Configure tax rate and type (see Calculations section)
Optional:
- Assign to Employee: Link invoice to a specific employee, later on you analyze employee performance based on invoiced amounts.
- Invoice Mode: Switch between PRODUCT and HOURLY modes using the toggle in the tab header.
Invoice Modes
Choose between two billing modes:
| Mode | Best For | Line Items Display |
|---|---|---|
| PRODUCT | Physical/digital products, fixed services | Quantity × Unit Price |
| HOURLY | Time-based work, consulting | Hours × Hourly Rate |
2. Customer (Required)
Select a customer from your saved customers list. You must have at least one customer to create an invoice.
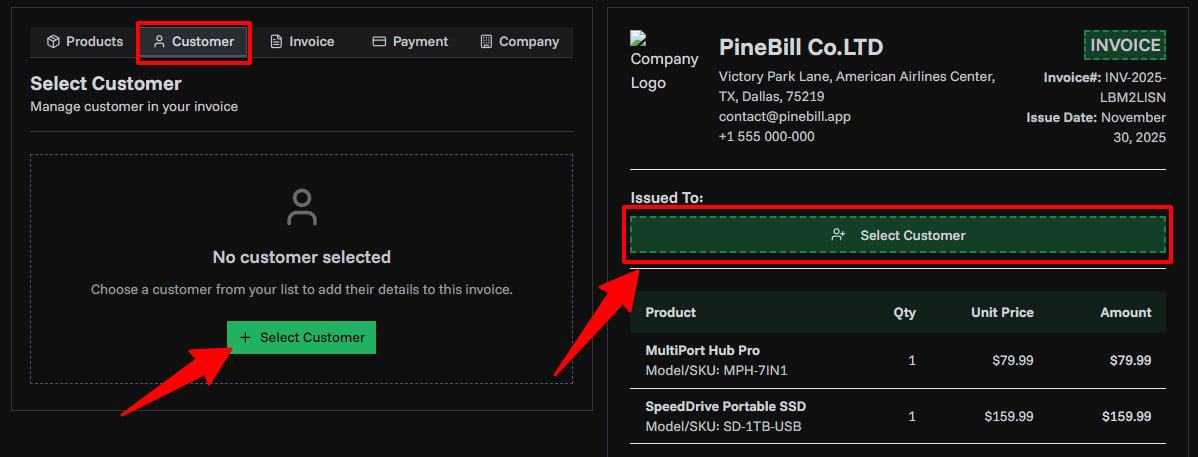
- Option A: Select existing customer - Click "Select Customer" and search or browse your list.
- Option B: Add new customer - Click "Add New Customer", fill in name, email, phone, and address, then save.
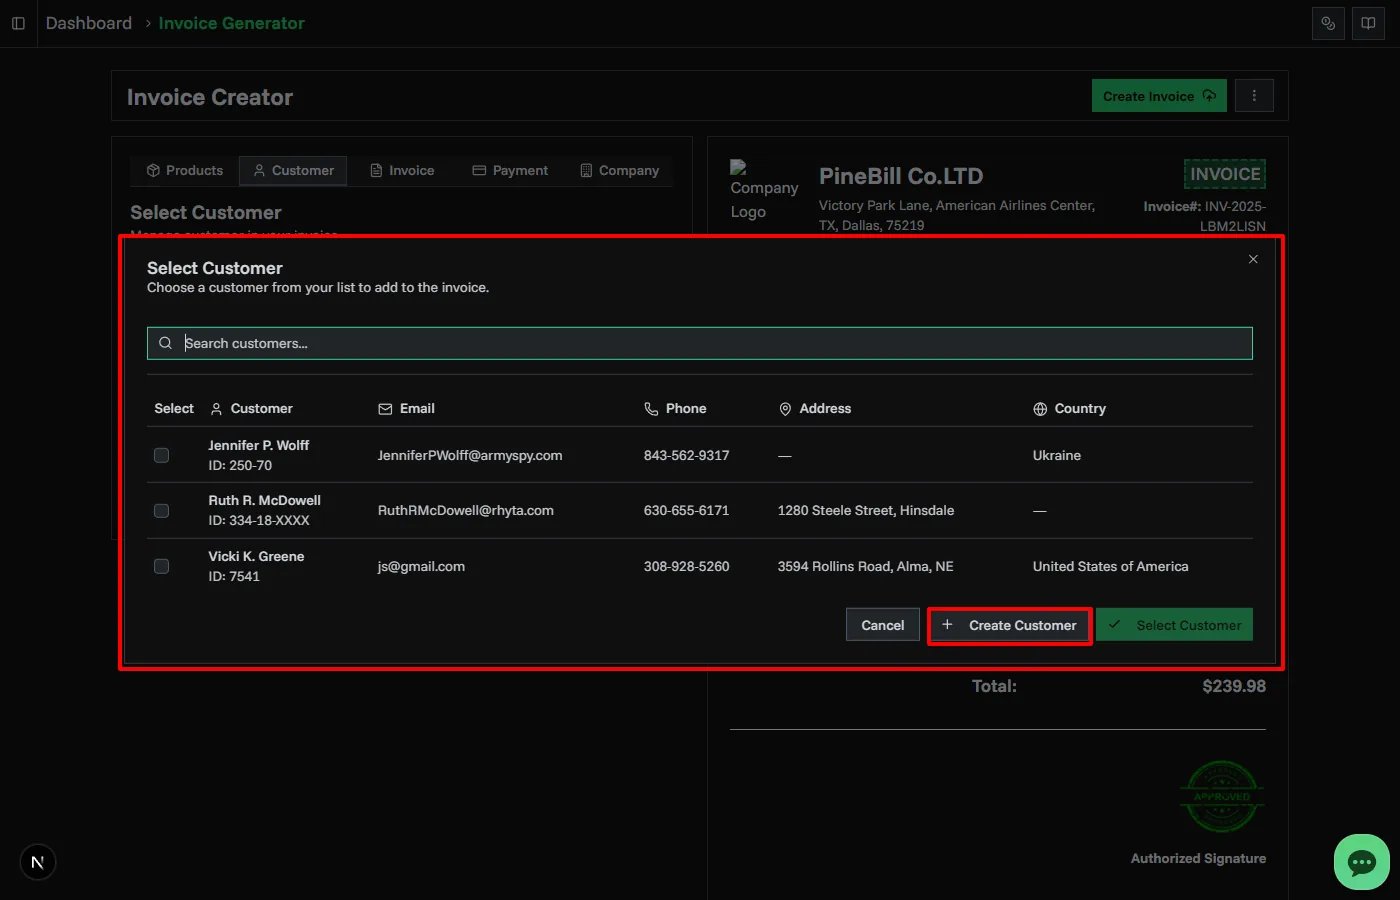
Included Customer Information:
| Field | Value |
|---|---|
| Issued To (Full Name) | Vicki K. Greene |
| Identifier | 1234 |
| Address | 3594 Rollins Road, Alma, NE 68920 |
| Zip Code | 68920 |
| sample@pinebill.app | |
| Phone | +82 123-456-789 |
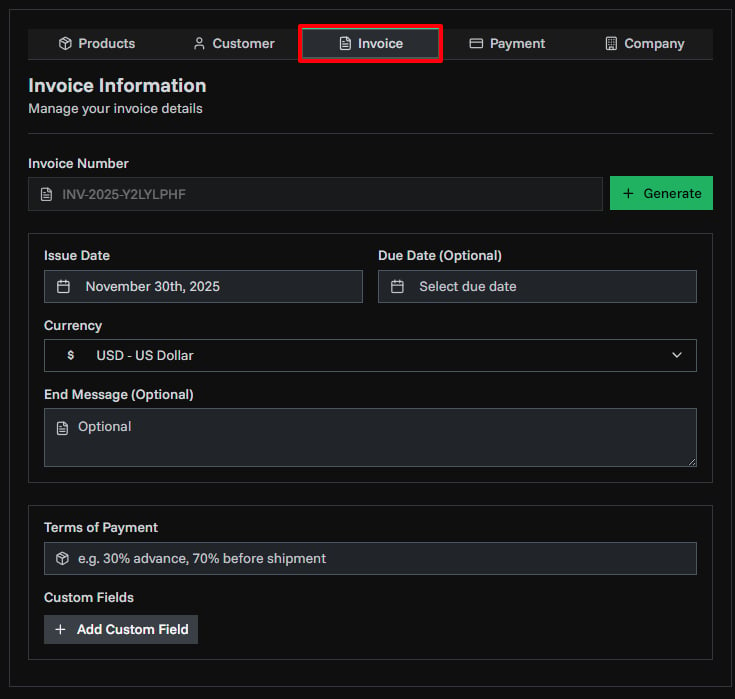
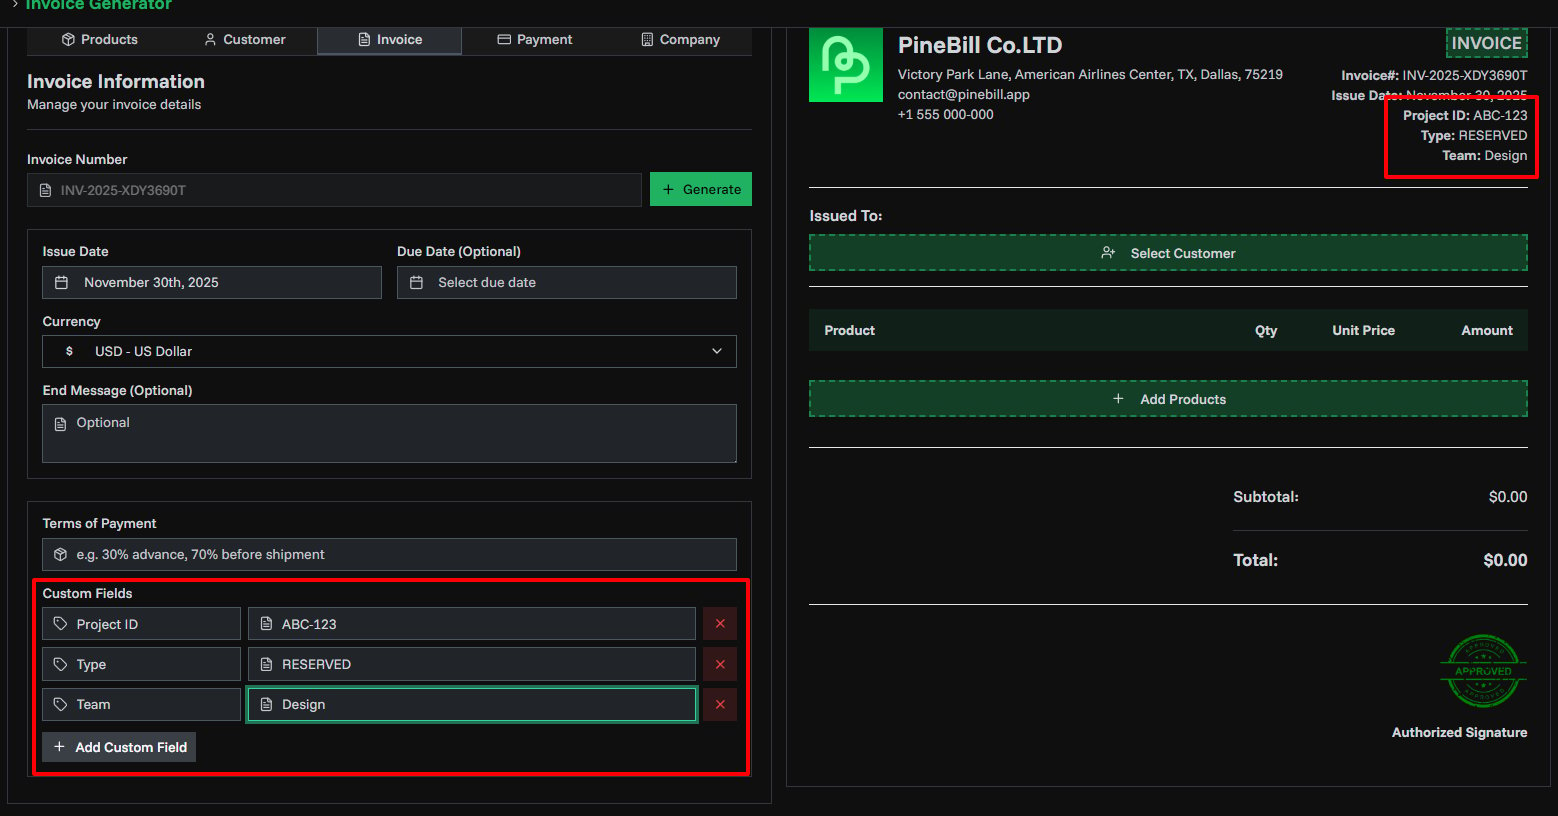
3. Invoice Details
Configure invoice metadata:
- Invoice Number: Click "Generate" to auto-create a unique number, the default behavior of Invoice number generation can be configured in Invoice Settings.
- Issue Date: When the invoice is created (Required)
- Due Date: Payment deadline (Optional)
- Currency: Select from available currencies, default is set in organization settings. Changing the currency will affect calculations and display of all invoice values. Default can be set in Invoice Settings.
- Currency Format: Choose how amounts are displayed: Symbol (
$1,234.50), Localized symbol (US$1,234.50), Currency code (USD 1,234.50), Currency name (1,234.50 US dollars), or Accounting (($1,234.50)for negative values). - Terms of Payment: Payment conditions (e.g., "Net 30", "50% upfront"), default can be set in Organization Settings.
- End Message: Custom note at bottom of invoice, default can be set in Invoice Settings.
- Custom Data Fields: Add unlimited label-value pairs (e.g., PO Number, Project ID), default fields can be configured in Invoice Settings.
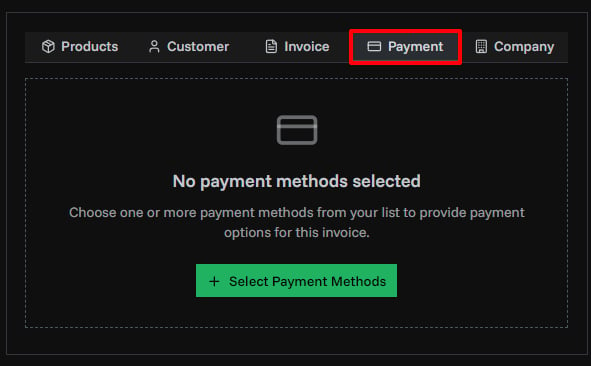
4. Payment Methods
Select one or more payment methods from your saved payment methods list. Payment methods are optional but recommended to provide customers with payment options. You can configure default payment methods in Payment Methods.
- Bank Transfer: Bank account details
- PayPal: PayPal email
- Cryptocurrency: Wallet address
- Custom: Any other payment method
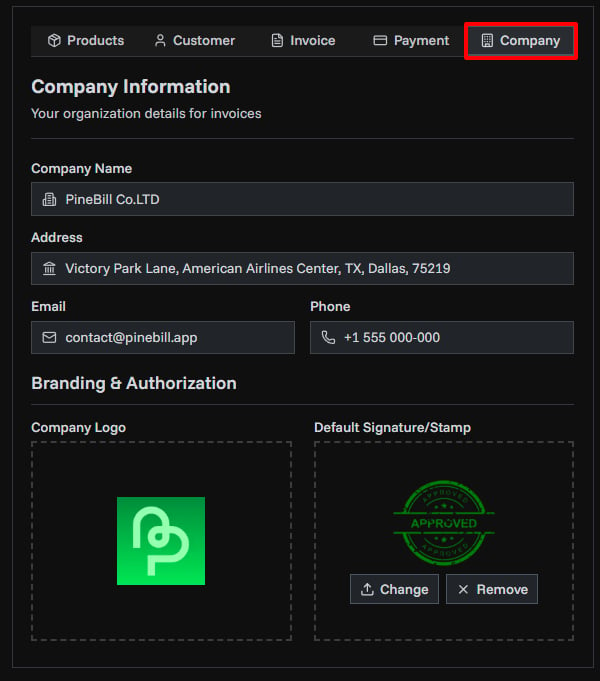
5. Company Information
Your company details are automatically filled from your organization settings:
- Company name, address, email, phone
- Logo: Only if uploaded in Organization Settings
- Signature/Stamp: Add a default signature for all invoices
All these details can be configured in Organization Settings.
6. Creating the Invoice
Once all required fields are filled:
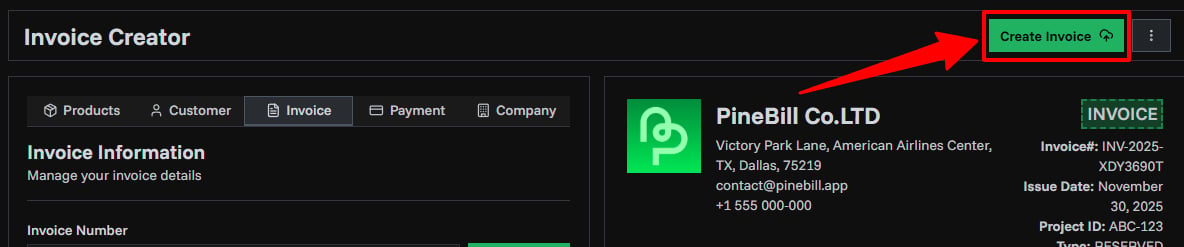
- Click "Create Invoice" button (top right)
- PDF is automatically generated
- Invoice is saved with DRAFT status
- You're redirected to the invoice detail page
From there you can:
- Download the PDF
- Share the invoice
- Update the status
- Edit if needed
Calculations
Tax Configuration
Two tax types available:
- Percentage (%): Tax calculated as percentage of subtotal
- Fixed Amount: Flat tax amount
Tax Included Toggle:
- ON: Prices already include tax (tax is extracted from total)
- OFF: Tax is added on top of prices (default)
Calculation Formula
Subtotal = Sum of (Quantity × Unit Price)
After Discount = Subtotal - Discount
Tax Amount = After Discount × (Tax Rate / 100)  [or Fixed Amount]
Grand Total = After Discount + Tax + Shipping
Advanced Features
Custom Fields
Add any additional information to your invoices:
- Click "Add Custom Field" in Invoice Details tab
- Enter label (e.g., "PO Number")
- Enter value
- Repeat for multiple fields
Related Topics
- Invoice Components - Understand invoice structure
- Invoice Statuses - Manage invoice lifecycle
- Invoice Templates - Choose template styles
- Invoice Settings - Configure defaults and number generation