Projects
Creating Projects
Set up a new project with budget, timeline, customer, and team assignment in PineBill.
Quick Start
Go to Dashboard -> Projects and click New Project.

Project Fields
| Field | Required | Notes |
|---|---|---|
| Name | Yes | Project name, up to 160 characters |
| Description | No | Brief summary of the project, up to 1,000 characters |
| Status | No | Active (default), Pending, or Completed |
| Customer | No | Link the project to a customer |
| Budget | No | Total project budget, must be zero or greater |
| Currency | No | Budget currency, defaults to USD |
| Start Date | No | When the project begins, defaults to today |
| End Date | No | Target completion date |
| Assigned To | No | Team member responsible for the project |
Step-by-Step Guide
1. Open the Project Form
- Go to Projects
- Click New Project
- Enter a project name
2. Add Optional Details
Open More Details to add:
- Description
- Status
- Customer
- Budget and currency
- Start and end dates
- Assigned team member
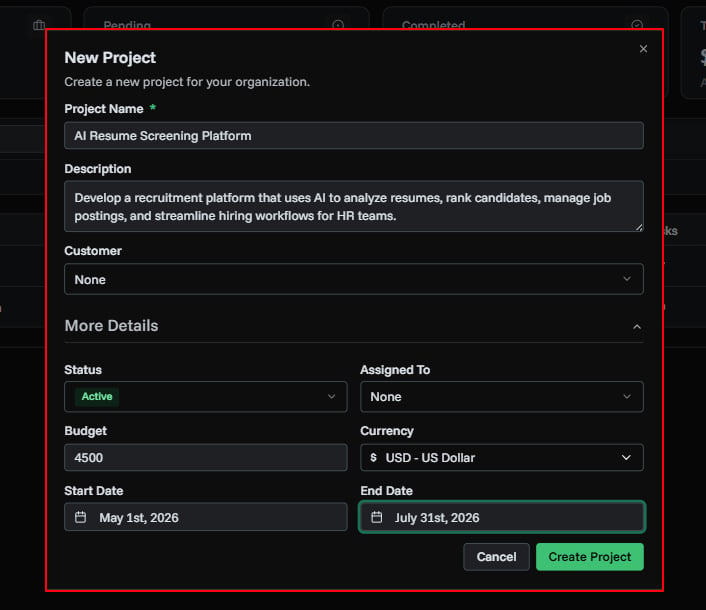
3. Save
Click Create Project. The project appears in your project list and is ready for tasks, invoices, and other documents.
Editing a Project
Open a project and click the Edit button, or use the actions menu on the project list. All fields can be updated after creation.
After Creating
Once a project is saved, you can:
- Add tasks and track time from the Tasks tab
- Link invoices, estimates, and expenses
- Generate a share link for client visibility
- Update the status as work progresses
Related Topics
- Project Management - Overview of project features
- Project Sharing - Share project progress with clients
- Task Management - Create tasks inside projects
- Customers - Add customers before linking to projects