How to Write a Payment Receipt: Components, Timing, and Tax Rules
A payment receipt is a document issued after a transaction to confirm that money has changed hands and the balance is zero. It acts as legal proof for 430,000+ businesses that rely on accurate record-keeping to survive IRS audits.
Whether you're a freelance consultant accepting your first $500 payment or a retail business processing hundreds of daily transactions, knowing how to write a proper receipt protects both you and your customers. This guide walks you through the 12 non-negotiable elements, shows you exactly how to format each section, and explains the automation strategies that can save you 2+ hours weekly.
The Real Difference Between Invoices and Receipts
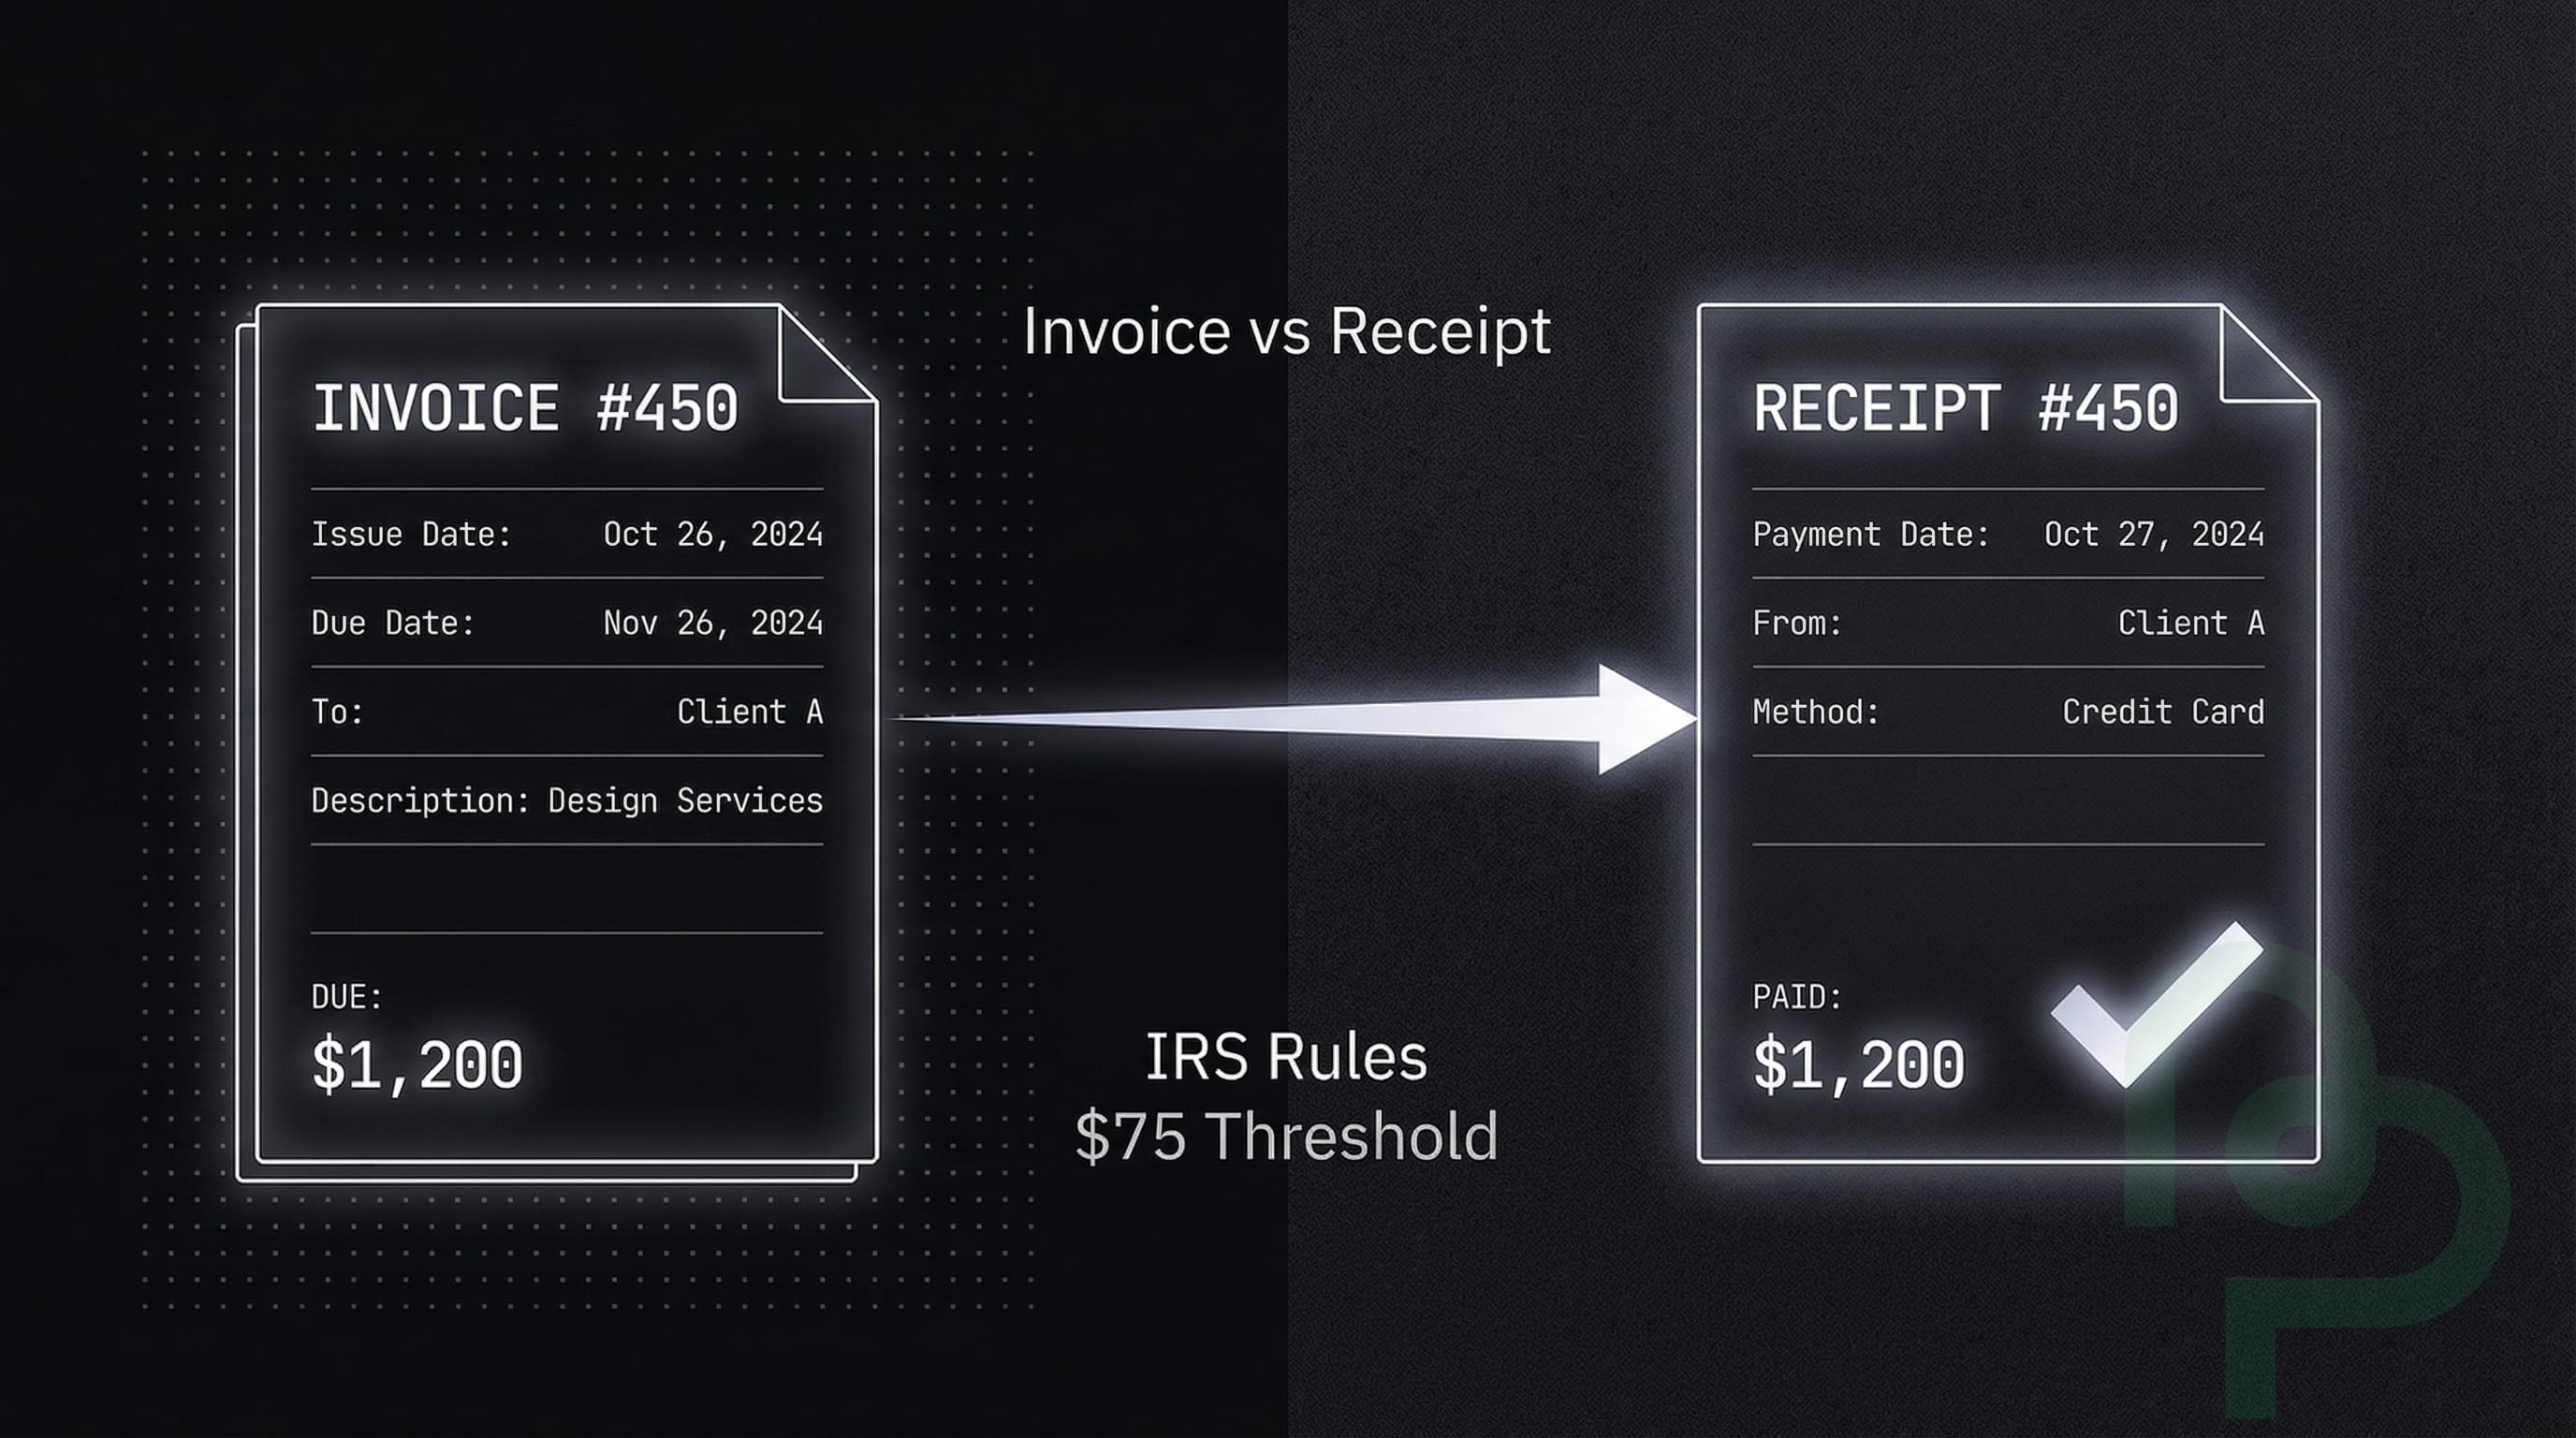
Timing dictates whether you send an invoice or a receipt. An invoice is a request for payment sent before money moves, while a receipt is a confirmation sent after the funds arrive. Confusing the two often leads to double-counting revenue in your ledger, which can result in overpaying taxes.
The reality: an invoice says "you owe me," whereas a receipt says "thank you for paying." Businesses with organized documentation systems experience 30% fewer financial discrepancies during year-end reconciliations . Accuracy matters.
| Document Type | Issued When | Primary Purpose | Best For |
|---|---|---|---|
| Payment Receipt | After Payment | Confirms transaction completion | All completed sales |
| Invoice | Before Payment | Requests payment for services | B2B and credit sales |
| Quote | Before Sale | Proposes pricing and scope | New project bids |
| Bill | Before Payment | Records money owed to vendors | Tracking expenses |
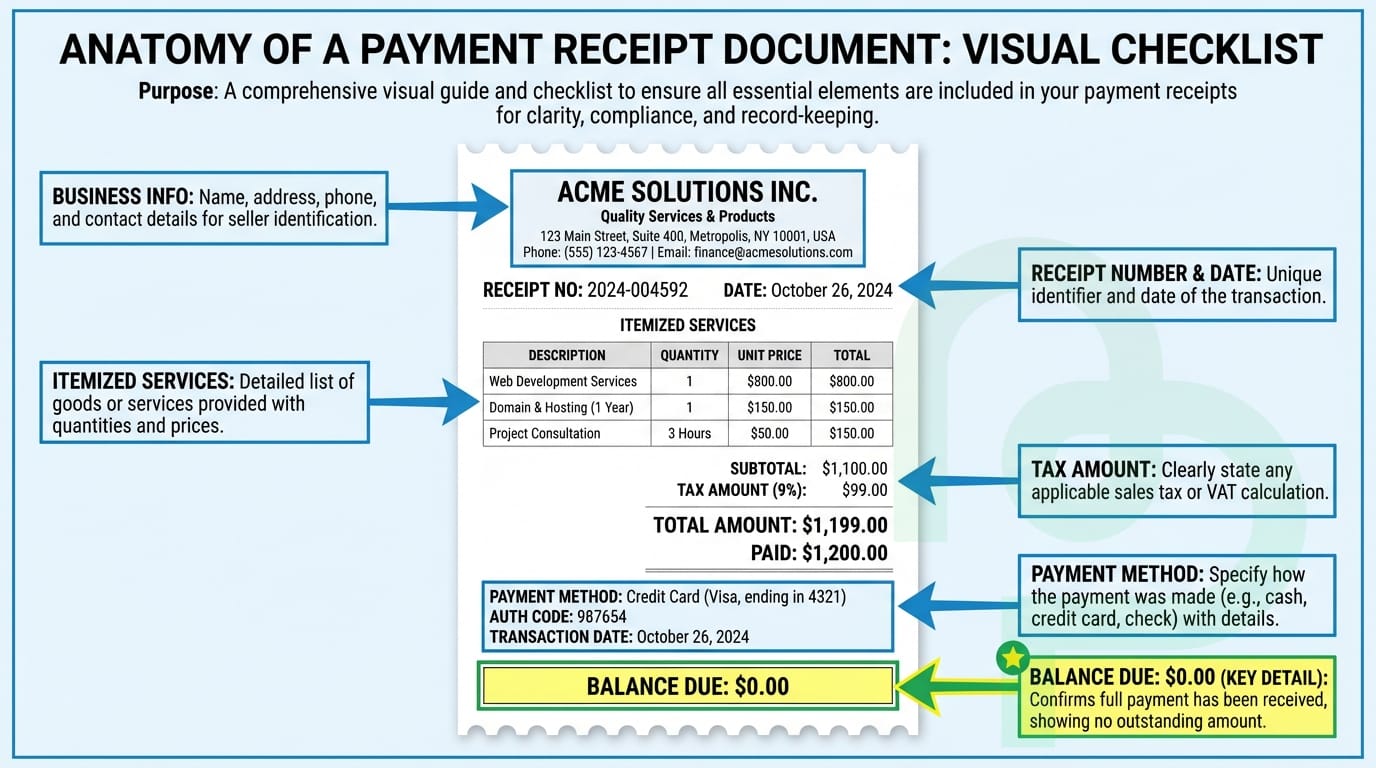
12 Essential Elements of a Professional Receipt
Every receipt must contain specific data points to be considered a valid legal document. If you're accepting a $1,200 payment for a landscaping contract, a simple "Paid" stamp on a napkin won't cut it during an audit. Missing even one critical element can invalidate your receipt for tax purposes.
Here's what must appear on every receipt you issue:
1. Clear "Receipt" Header
Label the document prominently as "Receipt" or "Payment Receipt" at the top. This distinguishes it from invoices, quotes, or other business documents. Without this label, confusion arises during bookkeeping.
2. Business Name and Legal Entity
Include your registered business name exactly as it appears on your tax filings. If you operate as "Smith Consulting LLC" but your customers know you as "Smith & Associates," use the legal name on receipts to maintain compliance.
3. Complete Business Address
List your primary business location, including street address, city, state, and ZIP code. Post office boxes are acceptable for service-based businesses, but brick-and-mortar stores should use their physical location.
4. Contact Information
Add your phone number and email address so customers can reach you if questions arise. This also helps during audits when tax authorities need to verify transaction legitimacy.
5. Unique Receipt Number
Assign sequential receipt numbers (e.g., REC-001, REC-002) to track every transaction. This numbering system prevents duplicate receipts and helps you quickly locate specific transactions in your records. Never reuse numbers.
6. Transaction Date
Record the exact date payment was received, not when the service was completed or the invoice was sent. For cash transactions, this is the date money physically changed hands. For digital payments, use the date funds cleared into your account.
7. Customer Name
Include the full name of the person or business that made the payment. For individual customers, "John Smith" is sufficient. For business clients, use their company name: "Acme Corporation."
8. Customer Contact Details (Optional but Recommended)
Adding the customer's address or email creates a complete record and makes reissuing lost receipts easier. This is especially important for high-value transactions exceeding $1,000.
9. Itemized Description
Break down what was purchased or paid for with specific details. Instead of "Services rendered - $500," write "Logo design package: 3 initial concepts, 2 revision rounds - $500." Specificity protects you if a customer disputes what they paid for.
10. Subtotal, Tax, and Total
Show the pre-tax amount, then list any sales tax with the applicable rate, and finally display the total amount paid. Example:
- Subtotal: $500.00
- Sales Tax (8%): $40.00
- Total Paid: $540.00
11. Payment Method
Specify how the customer paid: cash, check, credit card, debit card, bank transfer, or digital payment (PayPal, Venmo, etc.). This helps reconcile your records against bank statements.
12. Transaction Reference Number
For electronic payments, include the confirmation or transaction ID from your payment processor. This might be a Stripe charge ID (ch_3ABC123), PayPal transaction number, or the last 4 digits of the credit card used. This reference is critical if disputes or chargebacks occur.
Step-by-Step Guide to Writing Your First Receipt
Creating a receipt from scratch can feel overwhelming if you've never done it before. Follow these steps to produce a professional, compliant document in under 5 minutes.
Start with a Template or Blank Document
Open a Word document, Google Doc, or use dedicated receipt software. If you're using manual methods, create a template you can reuse for future transactions. Position your business logo at the top if you have one—it adds professionalism.
Add the Header and Business Information
Type "RECEIPT" or "PAYMENT RECEIPT" in large, bold letters at the top center. Below that, list your business name, full address, phone number, and email. This section should occupy the top quarter of the document.
Insert Receipt Number and Date
On the right side or just below your business info, add a unique receipt number. Start with "001" if this is your first receipt, and increment with each new transaction. Next to it, write the transaction date in a clear format: "December 19, 2025" or "12/19/2025."
Record Customer Details
Create a "Bill To:" or "Received From:" section. Enter the customer's full name and, if applicable, their business name and address. For walk-in retail customers, the name alone may suffice.
Itemize What Was Purchased or Paid For
Create a table with columns: Description, Quantity, Unit Price, and Line Total. List each item or service on a separate row. For a consulting session, you might write: "Business strategy consultation (2 hours) | 2 | $150/hr | $300."
Calculate Subtotal, Tax, and Total
Below the itemized list, show the subtotal (sum of all line items). If sales tax applies, calculate it based on your local tax rate and display it separately. Add these together to show the final "Total Paid" amount. Bold or highlight this final number.
Specify Payment Method and Transaction Details
Add a line stating "Payment Method: Credit Card (Visa ending in 4532)" or "Payment Method: Bank Transfer (Ref: TXN789456)." For cash payments, write "Payment Method: Cash." This detail is crucial for reconciliation.
Add a Thank-You Note (Optional)
Many businesses include a brief message like "Thank you for your business!" at the bottom. This is optional but enhances customer relationships. You can also add return policy information or warranty details here if relevant.
Review and Issue the Receipt
Double-check all numbers for accuracy. Ensure the total matches what the customer actually paid. Save a copy for your records, then send the receipt to the customer via email, hand them a printed copy, or both.
This format covers all 12 required elements and provides clear, organized information that both you and your customer can reference later.
Tax Retention Rules and IRS Requirements
The IRS requires businesses to keep receipts for any business expense exceeding $75. However, keeping records for all transactions is safer for your audit trail. You'll need to maintain these records for a timeframe of 3 to 7 years depending on the nature of the expense and your jurisdiction.
Specific Retention Periods
Different transaction types have different retention requirements:
- Standard business expenses: 3 years from the date you filed the return
- Underreported income situations (if you underreported gross income by 25%+): 6 years
- Employment tax records: 4 years after the tax becomes due or is paid
- Asset purchases (property, equipment, vehicles): 7 years or until the asset is sold, whichever is longer
- Bad debt deductions or worthless securities: 7 years
If you file a fraudulent return or fail to file, the IRS has unlimited time to audit, so indefinite retention of receipts is advisable in those scenarios.
Why Digital Receipts Are Essential
Digital receipts are now the industry standard because thermal paper fades within months. Using digital tools ensures your proof of purchase remains readable for the full 7-year retention period. If you're self-employed, these receipts are your primary defense when claiming deductions for home office equipment or travel expenses.
The IRS explicitly accepts digital records as long as they're accurate and accessible. In fact, scanned or digitally-created receipts often survive audits better than deteriorated paper originals. Store your digital receipts in cloud-based systems with automatic backups to prevent data loss from hard drive failures.
Key Takeaways
- Receipts vs Invoices—Invoices request money; receipts confirm it has been received.
- IRS Threshold—Always keep receipts for expenses over $75 to remain tax compliant.
- Retention Period—Store your financial records for 3 to 7 years to protect against audits.
- Digital Standard—Switch to digital receipts to avoid the "faded ink" problem of thermal paper.